freebieScience in the City: freebie
Showing posts with label freebie. Show all posts

Dec 20, 2019

How to Streamline your Lesson Planning

How to Streamline your Lesson Planning

Reduce Lesson Planning Time

I would like to suggest a few things:
  • Start with a similar structure like a template not only for the lesson plan itself, but for your unit, so you know what sort of activity you're looking for to plug in there.  Here is a basic example, but obviously you would have to make it fit the structure that you prefer.
  • It also may help to know what type of activity you are looking for. Are you looking for something hands-on? What skills do you need to address? Are you looking for something technology based? Are you looking for a writing assignment? You may want a mixture of those skills and types of assignments throughout the year.  It can be very helpful to make a grid, or even a list of the different types of skills and activities. Then you can track when you have used them, or check them off as you use them.  This allows you to see which type of activity you haven’t done in a while, or what you want to utilize more of.  Again, then you know what you are looking for in your upcoming assignments. This can narrow your search, and be better than staring at a blank screen. 
  • It’s also a good idea to go back to your objectives and focus on what you're really trying to accomplish. What is the most important thing for students to know both in terms of skills and content?  How are you going to get this across in your lesson next? 
  • Once you have some of these things narrowed down, absolutely don't be afraid to look at what's already out there!  I think it’s better to get a clear idea before you just start looking though. It helps you more efficiently find something that fits your needs. You don't need to reinvent the wheel!  If it already exists, or something very similar already exists, by all means use it!!  It’s also ok to start with something and modify a little bit. Maybe there is something that’s a reading and writing activity but you decide to use the reading, and make the response in the form of a presentation, go for it!
  • These tips won’t take away your lesson planning, but perhaps will save you some time and make it a bit more efficient.

What are your tips and strategies to use your time more wisely when planning?


Oct 18, 2019

Need Additional NGSS Science Resources? Start Here

Need Additional NGSS Science Resources? Start Here

If you are starting NGSS and finding it overwhelming, don’t be overwhelmed. It’s really not completely different than good science teaching practice has always been. We already teach students about thinking like a scientist, using evidence, problem-solving, and basic inquiry processes. Many of us are already using engagement activities or a discrepant event (not so different than a phenomenon). A discussion of the similarities and differences between inquiry and storylines is given here. They do differ, but there is overlap,

Yes, the curriculum and assessments might change, and your day to day teaching may change because of that, but it may not be as dramatic of a change as you may be afraid of!

As you are looking to build lessons that support NGSS, here are a few links and resources that could help: 

Need Additional NGSS Resources?  Start Here

NGSS Lessons

NGSS Lesson screener - this is a tool to check if your lesson is aligned to NGSS. A lot of your prior lessons might just need tweaking in one or two areas to fulfill the requirements. This is a very in-depth evaluation tool. They state that “a lesson is defined as a coherent set of instructional activities and assessments that may extend over several class periods or days; it is not just a single activity”

If you find that you need some additional tweaks, storylines, phenomena, or other resources to get you started, here is a shortlist of places to start:

Tweaks, storylines, & phenomena

  • NSTA NGSS Hub - a hub of resources created by NSTA, and organized by topic
  • Next Generation Science Standards - The standards themselves but searchable by grade level, topic, crosscutting concept, etc. If you are getting ready to teach a particular topic, it can be really helpful to see where it connects with other topics, or what exactly the students are required to know.
  • NGSS Phenomena - one part of NGSS that I really like, personally, is that it asks students to look at phenomena from the real world and to examine what is happening. As I mentioned, these are a lot like discrepant events or engagement activities, but they can also be used in other ways. This is a searchable database of pictures, videos and other phenomena. It also includes some pages on “How to Use Phenomena” and examples.
  • The Wonder of Science - This is a treasure trove! Of course, not all topics are present, but it is searchable by standard, and then includes examples of complete units with storylines, phenomena, etc. I would definitely start here to get your brain going!
  • Next Generation Science Storylines describes themselves as a project dedicated to providing tools that support teachers in developing, adapting, and teaching with strongly aligned NGSS materials in classrooms around the country. A storyline is basically a series of coherent lessons (coherent to students) that focuses on solving a problem. The steps should be driven by students’ questions. Again, for the topics that are covered, there are examples of complete units, with teacher handbooks and supporting materials.
  • Science Buddies NGSS Lesson Plans - Lastly, if you are looking for something a little briefer, that will let you get right into the lesson plans, this is a good place to search.
I also wrote about NGSS here. New York seems to be a bit behind, so I am not an expert, but I’m trying to share it with you as I learn. I’d love to hear from some of you who are ahead of the curve!

Sep 23, 2019

Free Character and Social Emotional Learning Lesson Plans

I know many of you help your students, and teach many other things than science.  We all know that to be successful in school, students need to have their social and emotional needs met, and be ready to learn.  As teachers, aren't we all so much more than just teachers of our content area?! Some of you teach these other life skills indirectly, or embedded in content lessons, and some of you teach topics other than science in actual homeroom/advisement course, etc. I was offered a this exclusive free resource for you for character development and social emotional learning to you, my subscribers.
Characterstrong social emotional learning plans

The CharacterStrong blog and podcast provides curricula and training for K-12 schools internationally. There will find inspiring and practical stories of educators implementing character development & social-emotional learning in their classrooms, CharacterStrong resources, case studies, and more.  It also includes many resources to help educators take care of themselves, and support the whole teacher.  There is an accompanying podcast as well. 

3 Days of Free Character Development Lesson Plans  

(NOTE: THE LINK I WAS GIVEN AS AN EXCLUSIVE READER FREEBIE IS NOT WORKING AT THE MOMENT. I HAVE CONTACTED THE COMPANY FOR AN UPDATED LINK).  

HOWEVER, AT THE WEBSITE THERE ARE STILL FREE SAMPLES AVAILABLE FOR ELEMENTARY, MIDDLE, AND HIGH SCHOOL, AVAILABLE FOR LEAVING YOUR EMAIL ADDRESS. 

I WILL UPDATE THIS POST AS SOON AS I HAVE AN UPDATED LINK.

Free Social and Emotional Learnig 3 Days of Lesson Plans

How can I use these free social and emotional learning lesson plans? 

Although many of you are science teachers, we all know that sometimes social and emotional learning and needs have to come first. Students may not be ready to learn science if their social and emotional needs are not met first.

Even if we can't always do this FIRST, per se, we can use sub days, extra class days because of assemblies or field trips, or times such as advisement to work on some of these skills. 

As it is not our main content area, many of us may not feel adept at teaching these types of social and emotional skills.  These 3 days of free lesson plans are a great place to start!

Please feel free to comment below if you use these how they go, or what you use to teach social and emotional learning in your classroom.


Jul 15, 2019

How and Where to Connect with Science in the City

I love to connect with fellow teachers and learn from each other.  Here's how

I love to connect with fellow teachers. We all learn from each other, and become stronger by communicating and sharing.

Some people prefer to connect in different ways. I am in a lot of places around the internet, and I’d love to connect wherever you are.
  • Email: Feel free to shoot me an email. I am usually pretty quick to response to email, and I love getting responses or questions from you. This is probably the most individualized way to communicate.
  • Mailing list: I send out free resources, updates, sale announcements, and subscriber only exclusives.
  • Blog articles approximately every 2 weeks on various science and teaching topics (as well as the occasional guest post or giveaway exclusive for readers).
  • Facebook Page: My Facebook page is not super active, but you will see upcoming news, newsletters, occasionally new resources, some humor.
  • Facebook Group: The best place to connect with me as well as other science teachers from around the world. There are 2500 members, science teachers from around the world. We share resources, and ask and answer questions.
  • Pinterest: I have many active boards of my own, and well as collaborative boards with other science teachers that cover many commonly taught science topics, as well as technology, differentiation, literacy, and more.
  • Instagram: I am not super active on IG, but I do occasionally participate in giveaways, and post pics of things going on in class, or new blog posts.
  • Twitter: Again, I’m not super active on Twitter, but if you prefer twitter new articles are posted there, and sometimes other updates.
Hope to talk to you soon!! 

Feb 2, 2019

Kinetic and Potential Energy Interactive Guide

Kinetic and Potential Energy Interactive Guide


I wanted to share a web resource with you that recently was brought to my attention. It is a really unique guide to potential and kinetic energy that includes interactive activities, examples, and plenty of sources for more information.

This would be a great resource to use to do a Webquest or other lesson with your students.   

This guide invites readers to learn more about all forms of kinetic and potential energy by using interactive graphics.  As you transition through the resource, each form of energy is broken down and explained in further detail.   The main content covered is outlined below: 

Potential energy is broken down into four types:

·        Chemical potential energy is present in every animate and inanimate object. Chemicals in a battery can be converted into motion, giving them chemical potential energy. 
·        Elastic potential energy is found when an object is in a deformed state but can be returned to a static state. This object is said to have elastic potential energy when it is either stretched or compressed. 
·        Nuclear potential energy is comprised of the force binding protons and neutrons because it causes the atom to weigh less than the sum of its parts. 
·        Gravitational potential energy is the ability for an object to do work in relation to a gravitational field. 

Kinetic energy can be broken down into four types as well:

·        Mechanical kinetic energy is observed when an object is in motion.
·        Electrical kinetic energy is seen when the electrical current carries the charge from a battery to the light bulb. 
·        In thermal kinetic energy, an object’s temperature can be transferred by convection, conduction, and radiation. 
·        In magnetic kinetic energy, magnetic fields are the effect of electric currents and the strength of attraction or repulsion on an object. 

Kinetic and potential energy also can work in harmony. All forms of kinetic energy are derived from a previous state of potential energy. An example is the chemical potential energy from a battery that is converted to electrical kinetic energy and transported to the bulb to produce light, which radiates thermal kinetic energy.


Jan 7, 2019

5 Days of New Year Science Cheer! Sign Up to Receive Gifts


If you aren't on my email list, use this opportunity to sign up! 

Click here!

A group of science teachers are hosting 5 Days of New Year Cheer this week!  This is not a random raffle or giveaway, there are deals everyday this week. Friday all email subscribers will receive a huge gift from myself and the other science teachers. BUT this is only for email subscribers, so get on the list before Friday!


Nov 10, 2018

Valuable Free Sample! Simplified School Day Checklists

Why are daily routines important?

Daily routines are so important for our students. As parents, and as teachers, we know this. We spend a lot of time creating routines that will help our kids get settled in the morning, or help our own children go to bed at night. Unfortunately, we don’t do the same for ourselves! We would reap benefits from this as well.

I know the school day can be chaotic. There are a lot of interruptions and things that can break up our routine, but it can help to at least have a checklist of important tasks to do, or what you want your morning routine to look like.

We know routines are important for our students, but they are also important for us.  Get started with these routines

Where can you institute routines?

You could have routines for your arrival to school, the end of the school day, or even weekly routines.

Here are some examples of my routines:

Arrival to school

  • Set up materials
  • Get mail?
  • Answer emails?
  • Take care of any urgent details
  • Get yourself in the right frame of mind
  • Attendance ready/rosters printed, cabinets unlocked, personal belongings locked, etc….

End of the school day

  • Make copies
  • Set up your schedule for the next day - plan what to do in the bigger blocks of free time
  • Plan any upcoming materials that you will need later
  • Set up the agenda on the board, get everything ready to go
  • “Let go” of the end of the school day

Weekly Routines (to be done during planning periods)

  • Monday: Make copies for the week; post updated grades or list of missing work
  • Tuesday: set up lab materials for the week
  • Wednesday/Thursday: phone calls, grading
  • Friday: Work on plans for the next week, touch base with resource teachers etc. 
Of course, these will need to adapt to you and your situation, but hopefully, this will give you some ideas to get started and make sure your aren’t forgetting anything, or keep these things a bit less stressful.

Now, where do you keep track of these routines?

I am a huge digital person most of the time, but sometimes paper is better. Here are a few options

  • In your calendar or planbook, either with a paperclip or post-it on the page
  • In a sheet protector or laminated and taped to your desk
  • Google Keep (did you know you can just make checkboxes and then uncheck all). See the picture below

The bottom line - keep it somewhere that you will use it, and see it. If it helps you to physically check things off (like it does for me) then make that easy too!

What would you like to add to these lists? What fits your daily routines?

I would like to try something new on this post and make a shared document where we could all brainstorm routine tasks, to help each other think of where they fit in.  Click here to open this document in a new window and add your thoughts!  You can also certainly then make a copy of this document and use it to make your own routine checklists!

Sep 9, 2018

How to Organize Bellringers or Tickets Out

How to Organize Bellringers or Tickets Out

How to Organize Bellringers or Tickets Out

What are some of the concerns? 

I have been asked about how I organize my bellwork and warm-ups, both in terms of how I organize the papers and the class time. Some of the complaints that I've heard are against doing warm-ups are: too much grading, too much time being spent in class time, wasted for students to settle down, too much shuffling papers and more.

Grading

I have already addressed the grading in a couple of other posts here, here, here, and here.

Timing

As far as the class time I'm really a stickler for using a timer and keeping my bell work very short. I know some people do bell work that's a bit longer, it depends on the length of your class, and how you want to run your class time.  I usually keep it to three to five minutes. My bell work is one two three questions. If it really seems that people are working and need an extra minute or two I make extend it.

I enforce that by using a timer that is visible on the Smartboard. Depending upon how you setup your bellwork there are stand-alone timers, internet timers, Smartboard timers, the 1-click timer Chrome extension and many others.

Paper Organization

As far as how to organize the papers I've done it a few ways. I like to keep all my bellwork questions for a one-unit together in either a Google slide presentation, PowerPoint, Smart Board file, etc. Then I have the students answer on a bellwork or warm up sheet link here.  They turn this in each day.  Before their class, I spread them out on either a back table, counter, or something like that.  On their way in the students can grab the paper with their name on it. It's a little extra incentive for them to get to class early or at least on time because the timer starts when the bell rings.

Electronic Organization

When I have done bellwork electronically I have most often used a Google form. I share the link through Google classroom.  They can quickly click on it answer, and all the answers come to me in one place.  I can also turn the form off when the time is up, so that they have to submit in a timely fashion.  I have also done a Google slide.  In this case, I have all my warm ups in that slide file. I copy just today's slide. share it with them through Google classroom or through a force copy.  They put their answers on it and then submit.  Google Classroom really facilitates this very easily.

Class Time

As far as during class time I can usually make a quick assessment if I want to discuss bellwork or go over it based on what I see when students are working.  If I use a Google form where I can get instant feedback then, I can pull the results up on the board and this can help me assess and decide if I want to have a class discussion. If I find out that I'm wrong it's perfectly okay to go back the next day.

What questions do you still have?  Ask them here and I will do my best to answer!

Aug 26, 2018

Save Time: Streamline Your Earth Science Year

If you are teaching Earth Science and you've never taught it before you may be a bit overwhelmed by how to organize the curriculum. Earth Science here in New York State is a combination of Astronomy, Meteorology and Geology with a little bit of Environmental Science mixed in.

That's a lot of different topics!


How to organize it in a way that makes sense to your students? There really a lot of right answers to that and if you look across districts in New York State, or across the country, you will find a lot of different organization systems, of course. I wanted to share with you the Scope and Sequence and pacing guide that I use to organize my class.


I follow this basic outline for a few reasons.

First of all, I think it's important to focus on some of the topics that we know will be on the New York State lab practical later in the year, closer to the exam. Those points are so critical to students really doing well on the exam. I also like to start out the year bringing in topics where things where we can get students outside for some very simple activities (looking at shadow lengths to study the Sun’s path, build in lots of hands-on lab practice early on). I also sometimes like to look at some news stories about hurricanes (often happening near the start of school), or use this as a chance to practice mapping, and foreshadow some of the topics coming later.

By the time we get to study weather and climate, we may have a storm or two to talk about and make some real-time observations. I also like to intermix, or spiral, the topics so that students see the connections between those topics. There are many other ways to organize Earth Science as well, but this is a system that I found works well. If you are looking for starting point please go ahead and download it. This pacing guide includes some basic objectives and approximate time for each unit it's a good pacing guide you going. Then you can always adapt as you see fit.

If you like this, you may be interested in my more complete Earth Science Curriculum Guide, or other Earth Science Resources that I have.

If you do download my free pacing guide, and it helps you organize and streamline your Earth Science curriculum, I’d love to hear your thoughts, either in the comments, or in our Facebook group!

Feb 4, 2018

Free, Engaging NGSS Aligned High Tech Resource For You

Free, Engaging NGSS Aligned High Tech Resource For You


If you are looking for a new and different, technology-rich activity to introduce students to a career in science, increase literacy in science, and practice using claim-evidence-reasoning (CER), I want to share a resource with you.

**Disclosure: This is a sponsored post, but all opinions are genuine and are my own.** #sponsored

I was asked to write a sponsored review of the UL Xplorlabs Fire Forensics Module, and I am very pleased to share it with you! I also asked my sixth grade son to go through it and give his feedback.

Xplorlabs has made two modules that are free, STEM-focused, and NGSS aligned. They have supplementary hands-on investigations that could be used in the classroom, and tie to both safety and real-world problems. I looked specifically at the Fire Forensics Module and found it very engaging, and found it to provide a fun, interactive online environment for students to learn from real scientists.

What is included in the Fire Forensics Module?

The Fire Forensics Module is an interactive web-based lesson that teaches about fire, but also teaches about building an evidence-based claim as students go through the process of being a ‘fire investigator in training.’ It is “designed to provide students with the understanding of fire, fire dynamics, and fire behavior so that they can read a fire scene and build a claim for the fire’s location of origin and cause.” It includes videos, embedded practice quizzes, a model where the students and instructors analyze the fire together, and then a culminating activity where the students analyze the fire themselves, from evidence, and then submit their analysis along with claim, evidence, and reasoning to their teacher or print it out.

The module is very well scaffolded, with short (1-3 minute) videos from current fire investigators, education on the fire itself, and on the tools used for investigation. There are interactive activities and self-checks, and also supplements hands-on activities that can be used (but it works fine without it as well).

The content covered focuses on the basic science of fire, and the fire investigation process itself, but they also use this as a lens through which to teach and practice claim, evidence, reasoning, and the scientific method. Depending upon the extension activities chosen, you could also use this to practice graphing.

As students work through this module, they are first introduced to the job of fire investigators and why it is important. They enter the ‘investigator’s academy’ and learn some background about how fire is defined, how fire develops, and how it behaves. They will then go through a ‘model’ fire in the lab, and then investigate a case and build a claim, based on evidence and reasoning.

What’s great about it?

I really liked this module, and would not hesitate to use it with students. The videos are short, engaging, and fast-paced. The website is very professional and easy to navigate, while still being kid friendly. There are self-checks built in and interactives to keep students on track. If students miss formative assessment questions they are given explanations, and then try the questions again before moving on. I really like that it integrates the career piece. This can be so important for students to just see what else is ‘out there’ and available to them as a career.

The whole module builds on itself seamlessly, and integrates supplemental activities if you choose. However, you could easily use only part of the module, and could include or omit as many of the extension activities as you choose. If, however, you do choose to include the extensions, they come with great teacher instructions, including materials list, roles, etc.

The whole module culminates with students solving a ‘case,’ establishing their claims, using evidence and reasoning to support it.

Feedback from my own middle schooler

This activity is geared towards middle school. I have taught middle school, but at the moment I’m teaching high school. I do, however, have a 6th grade son, so I asked him to go through at least some of the module and give me his feedback. He completed the first four sections during some free time. He liked it so much that he wants to go back and finish it, or check out the other module that they offer on his own! But he really liked the short videos, and the interactive charts in section 2 where you could modify the components needed for the fire and see how the fire changed (visually). He said he learned that the amount of heat, oxygen, and fuel changes how big the fire is, which he didn't know before. He thought all three had to be present, but didn’t know that the fire would change if there were different amounts.


He found the website easy to follow and thought the directions were very clear. He said he learned a lot, but the most interesting takeaway was that he had no idea there was such a job as a fire investigator. He said he could see his teachers doing this in science class, or even on a day where there is a sub because the students would be able to go through independently.

When would I use it?

As a teacher myself, I thought a lot about when I would use this activity. Some activities I’ve seen in the past are ‘fun,’ but really don’t fit with any curriculum. I think this one does, however. If you were teaching a forensics course, it is a natural fit, as well as a unit about careers. However, I think it would fit as a way to practice CER and using evidence. Because of the extension activities, it would be a good way to extend a unit on heat transfer, or even experimental design. Of course, it could also be a great activity to use with a sub, before or after the break, or any time you need to fill time. The module could take anywhere from two class periods to a week or more, depending upon how many of the extensions you use. There is one hands-on activity built into the module in Section 3 (Live Burns) after the video, at the top under the link 

There are also additional activities on their main website, under Xtensions.

Things to consider?

This activity is great, but there are two caveats to keep in mind, as a classroom teacher, and they are pretty simple:

If YouTube is blocked at your school, you may run into problems. The videos are beautifully embedded, and look like part of the website, but they are coming from YouTube and won’t work if YouTube is blocked. You may need to download these videos and show them together, or download and give students a separate link, but that will disrupt the flow of the activity.

The student’s responses on the final culminating activity, where they submit their claim, will get printed or emailed to the teacher, but the rest of the activity is self-guided. This would be fine for most students, and it is very straightforward, but depending on your student’s needs you may want to make some type of guided notes to go with it, so that students have a reference point when they get the culminating activity, and also have accountability.

What to do next?

So where to go from here? Try it out! Go here and check it out! If you do use it, I’d love to hear what you think either in the comments below, in my Facebook Group, or anywhere else on social media or email.

A free NGSS aligned resource that helps students practice CER in an engaging way

Jan 7, 2018

Living Environment Regents Review


If you are a Biology (Living Environment) teacher in New York State, you may be thinking about the upcoming January Regents Exams. Do you have students in your classes who are going to be re-taking the exam? Did a counselor or administrator just come to you to help a senior who needs that exam to graduate. Maybe you just taught a semester class, or even a Regents prep class, but are looking for a way to wrap up or are feeling rushed for time. Looking for a way to determine what to focus on for the January exam? I can help!

Tips as well as a free resource to help students with the NYS Living Environment Exam


This Regents Review Resource is focused on the topics that are most frequently tests, from analysis of past year’s exams, and looking at common diagrams, types of questions, concepts, and vocabulary. There is so much in the course, but in reality, there are key concepts that always make up a substantial number of the points. Use this to your advantage! (And, more importantly, your students’ advantage).

Cell Membrane Review For Living Environment from Science in the City

Click here to get a one page (single topic) review sent to your email.


Living Environment Review Free Sample
.

This resource can be used in a variety of ways, depending upon your available time. You can review one page (topic) per day. You can have students work in partners to do a page and then go over the answer. An answer key is included, so you could absolutely just give it to them at home, with or without the answer key. Of course, since it is divided by topic, you don’t have to use all the pages. I have some really creative ideas where teachers have set up stations, or contests between different groups.

Some of my most recent feedback:


If you are looking for other ideas for to review, I would suggest you check out some of my earlier posts on Fun and Easy Ways to Gamify your Review and Tips for Successful Year End Review

I’d love to hear about how you review, and what you find most helpful to get your students ready for Regents Exams.

Tips as well as a free resource to help students with the NYS Living Environment Exam

Nov 30, 2017

Lots of Freebies Coming Up Next Week

This is just a SUPER quick post to try to get the word out:

If you aren't an email subscriber yet, please sign up! 

There are TONS of free resources coming your way next week, but only for email subscribers.

As a blog reader I don't want you to miss out.

Please sign up, using either the pop up or the sign up form at the top and get yourself on the list to get a TON of free resources next week.


Nov 5, 2017

How to Use Technology to Differentiate


Using Technology to Make Differentiation Easier

How to Use Technology to Differentiate
We have all been there. We are supposed to teach students to meet the same standards, but we definitely do NOT have 25 of the same students sitting in front of us! How do you meet these varied needs within one class? You may have student reading at a huge range of grade levels, or students with a wide range of disabilities, and capabilities, or even students for whom English is not their native language. This is where differentiation comes in! Differentiation can be overwhelming, but it doesn’t have to be so overwhelming. You can make some small changes that can have a large impact on your students, and technology can help make that a lot easier for you.

As we probably are already aware, there are many different ways to differentiate. Differentiation is commonly broken down by process, product or content. For any of these methods, technology can be a great tool for differentiation. Here is good basic overview of the three types of differentiation, if this is new for you, or you want a quick refresher. I am not going to rehash all of that, but instead I will seek to give you some tips on how technology can help you differentiation.

Differentiation by Content

Differentiation by content refers to different ways that students could get the content, or perhaps even slightly different content. What students are learning may be different. Some students may get the material through reading, watching a video, small group instructions, or even different videos, or different reading levels. Students could even read text off of a screen, but use a screen reading chrome extensions so that the text is read to them.

Look into Newsela or readworks for levelled reading materials, and videos already discussed such as Bozeman Science, Khan Academy, Amoeba Sisters, Crash Course, and many others for content at the appropriate level.

This is a place to play around with a flipped classroom idea, and create an instructional video, even if students watch it in class. It allows them to watch and replay, take notes, while you work with other students, and maybe a third group of students reads about it. You can, essentially, be in more than one place at the same time.

This can be done by choice, or with different content sources assigned to them. Google Classroom makes it very easy to assign different content sources to different students.

For additional information, here are some great step-by-step directions for using Google Classroom to differentiate.

Differentiation by Process

Differentiation by process is all about what the students do to process the information, or HOW they get the content.  Differentiation by process can certainly overlap with content differentiation, as students may work through the content using one of these processes (think-pair-share, reflection, diagram labeling, etc). Content differentiation is the content itself. Process differentiation is how students take in the content, or what they do with it to process it. For example, even as students are taking in content, they can use screen reader extensions to read the text, use dictionary or translation tools to help understand the text.

Process differentiation means you may give an assignment with some options. Perhaps some students can work in a group, and other can work alone. Students can choose to use technology, or to do their assignment on paper. Students need a way to process the material, but there are many ways that this can be accomplished. Students can process their learning through drawing, writing, making a video, using a technology such a flip grid, talking with a partner and more. Some students may be helped by a video that they can pause, rewind, re-watch, and use closed captioning.

These methods may need to be taught, or alternated/cycled between, and then eventually students could perhaps have a choice. Another strategy would be to give students a choice between just two methods, and then gradually introduce other methods.

The Science Penguin has a great post on “Output Ideas.” Although these are designed to be on paper, it is not a leap to see how these could be differentiated even more easily with technology. Students could make a short recording, find a diagram and label it, type their response and more.

For more ideas check out this post on 4 Technology Rich Ways for Students to Demonstrate Knowledge

Differentiation by Product

Lastly, differentiation by product is probably the type of differentiation with which we are most familiar, where student create a product to demonstrate their learning and are given some type of menu, or choice. A very simple example is this Vocabulary Menu where students have a choice over what the turn in to demonstrate their understanding of the vocabulary terms.

This is also a great place to look at the post on 4 Technology Rich Ways for Students to Demonstrate Knowledge. Technology gives more options. Are you artistic? Make a poster. Not artistic? Make an infographic or slideshow, where you don’t have to draw. Would you rather write? Or speak? Write an essay or editorial, or make a podcast or video.

Just like in the regular class, without technology, differentiation is key to helping your students be engaged and feel successful. The methods to differentiate may be similar, but it is easier in some ways to make changes to the assignments and to have the changes be less visible (such as through the use of screen reader apps, or Google Classroom to distribute differentiated assignments to different students). There is less stigma attached. Also, technology helps create a classroom culture where students are more independent learners, learning in their own way. This is a great fit for differentiated instruction.   Using technology means you can use the tools available to you to help create modifications, or create additional instruction.  You don't have to create it all!

How to Use Technology to Differentiate


Jul 29, 2017

5 Best Start-of-the-School-Year Experiments


Favorite STEM projects and science demonstrations, as well as discussion of what makes a good demonstration for science teachers.

Great Science Experiments and Demonstrations

One of the fun things about being a science teacher is being able to do hands-on activities and fun demonstrations.  These are the things kids remember when they get home, and remember years later. We've all been at some type of picnic or family function and heard someone talking about their crazy, wacky science teacher and the demonstration they did in class. Its multi-sensory, and different than other classes, and therefore more memorable! 

What are some of your favorites? 
What do you think makes a good demonstration or a good hands-on activity?

Requirements for a good demonstration

In my opinion, these are some things to consider to make a successful demonstration
  • It must use readily available materials. Materials that are too hard to get are unfamiliar to students and difficult for you to set up. It's also difficult to make up for students who might be absent 
  • Must work reliably! You don't want an activity that only works some of the time, or even most of the time, you need to be pretty sure that it's going to work.
  • It must clearly demonstrate the principle that you were trying to show. This should not be a leap for students to understand the science after they have done the initial activity or seen the demonstration. 
  • Sometimes I do an activity as a demonstration because I want to talk about it as we're working, it would be difficult for students to carry out correctly, or because I'm limited on space and materials for students to do it on their own or any variety of other reasons including safety. If it is feasible for students to carry out themselves, that is preferable.
Here is another source on what makes a good demonstration

Here's a secret for you

As a science teacher, demonstrations are fun, but I don't really like doing them! I get nervous! It's too much like a stage performance. I'd much rather have students run through stations or do activities. But some activities still lend themselves well to demonstrations. 

My Favorite Demonstrations 

(with accompanying videos; which can be a back up plan if you really don't like doing demonstrations)

STEM Projects

What about stem projects? What are some great stem projects to get your students thinking? Building and interacting? These can be great for the beginning or end of school or even for summer school, summer camps or those off days, such as those with assemblies. 

Stem projects and stem activities are such a broad category if you look them up you will find a wide variety of things. In my mind they break into at least two categories. Those that are chance for students to develop a hypothesis and test an experiment, and those that are a chance to build a product and work with a team to problem-solve and create something.  These may overlap, for example students may test something to make their product better.  However, students aren't really demonstrating the scientific process they're focused on working towards a goal.  This is more of an engineering project. 

  • One of my favorites is soda can cars. Students can even recreate this at home if they want to pretty easily.  
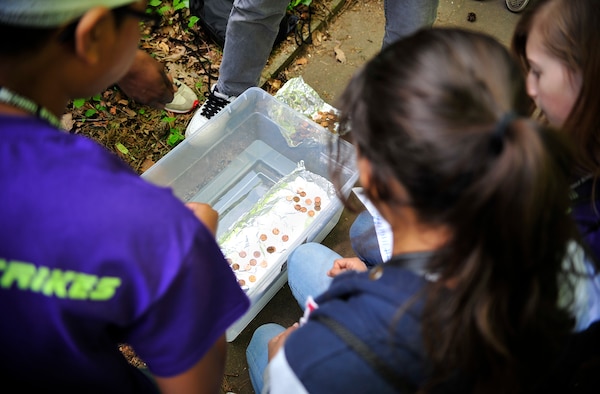
  • Another favorite is to see who's raft or boat can support the most pennies or paper clips.  

Image result for coin aluminium foil boat
From http://www.ramstein.af.mil/News/Photos/igphoto/2001055392/
  • There is a common experiment, which is very engaging with milk, food coloring, and dish soap.  Just be aware of the potential for a lot of cleanup, or any milk allergies. 
  • Static electricity activities can be easy, fun and engaging, such as bending water, and balloon races.  These are described in details here in my FREE STATIC LAB
  • A balloon car or a CD hovercraft are also a lot of fun, and can be a chance for students to experiment and improve their design.  
  • A solar oven can be a longer-term project where students can really experiment with the materials and the angle, or it can be done as a one time project. 
  • More ideas are available here and here.  

Some of these can be a chance for students to experiment and develop an experiment, hypothesis, and a procedure. Others can be a great chance to explore a new topic or new concept at the beginning of a unit.  They are also great as a quick station or engagement activity, as well as a jumping-off point to get further into the unit.  In my opinion, they should be something that can be carried out in a period or two, unless you really want to start a much longer project.  Otherwise you risk losing the flow of what you are trying to teach. 

Lastly, another way to go is longer-term projects such as factors that affect seed or plant growth, longer-term monitoring of weather, composting (conditions that cause garbage to break down) or even setting up ecocolumns.  

For more information on these type of projects, I would just looking into Problem based learning (more to come on that).  A couple great sources of information are available here and here.

I'd love to see pictures of your science activities!  Please share with me on facebook, instagram or by email
Favorite STEM projects and science demonstrations, as well as discussion of what makes a good demonstration for science teachers.

May 11, 2017

Tips for a Successful Year End Review


Tips for a Successful End of the Year Review

Reviewing for regents exams, or other state exams can be overwhelming. There is so much content: labs, diagrams, vocabulary, and just facts to know. Students want to do well, but they are tired, and they often don’t know how to study on their own. They don’t want to listen to you lecture, and you don’t want to lecture, but they need direction.

Tips to use for end of year review, especially in high school biology class (Regents)

When reviewing for state exams, in particular, it is critical to look back at past state tests and to see what has often been asked. For New York State those exams are available here. However, students quickly get bored and frustrated with simply doing past questions. This doesn’t give them a study tool, it often just shows them what they already know, or what they don’t know. Many students are not able to take this to the next level and use it as a study tool.

We as teachers want to help them succeed, and want to feel like we have done everything we can, but many teachers struggle with ‘what to do for review?’ or ‘how to structure the review to cover the right content?’

Tweet: However, students quickly get bored and frustrated with simply doing past questions. This doesn’t give them a study tool, it often just shows them what they already know, or what they don’t know.

This is How I Structure My Year End Review

Homework

For my year end review I like to assign something fairly open-ended, with choice for homework. This is something that students can make progress on their own, and won’t be studying ‘wrong’ but will be learning some study skills. One choice would be this free Review Assignment (applicable to any subject). This also eliminates the problem of cheating on practice test questions assigned at home.


Break it up

This is also a good time to utilize games and puzzles to break up review after students get bored of lecture and/or practice questions. A very popular way to do this is the use of Tarsia Puzzles (also called Magic Squares).

The ‘Meat’ of the Review

The bulk of my review, however comes from this resource, which I have created. It is organized by main topics within the New State Living Environment Course (Biology). Each topic has one or two pages. It is in guided notes format, with key diagrams that need to be labelled, or bullet points that need to be filled in. It can be used in several ways.


Depending upon the group of students that I have that year, I may use this resource in several ways:
  • Hand out the entire packet at once, or I may hand it out one topic at a time, or only use some sections and review other sections in other ways.
  • I will often put students in partners (or on their own) to complete a short section, then regroup and go over it.
  • I have also had them complete a short section, check with a partner, and then check their answers against the key.
  • A teacher answer key is included, so it is a very easy option if you want to copy the answer key for students (or a portion of it).
  • I have also had students lead, up at the board, going over the answers with the answer key.
Here is a free sample of one topic if you'd like to give it a try!

It is open-ended enough that it keeps students actively thinking and engaged, but complete enough that it gives them a great study resource when they are finished.

This includes sections for the New York State Required Labs (Beaks of Finches: Evolution, Relationships and Biodiversity: Evidence for Evolutionary Relationships, Making Connections: Experimental Design and Homeostasis, Diffusion through a Membrane) as well as the following units of study:
  • scientific inquiry
  • classification of living things
  • microscope, cells 
  • macromolecules
  • enzymes
  • cell membrane
  • photosynthesis and respiration
  • nucleic acids
  • mitosis and meiosis
  • genes and heredity
  • modern genetics
  • evolution
  • human body systems
  • reproduction
  • homeostasis
  • ecology
  • and human impact on the environment. 
The main points that are reviewed in each section are based on questions and topics that are most commonly asked on state testing.

What Else do I do In Class to Prepare them for the Test?

I usually review a topic or two using one of the above discussed methods and then do some practice past state test questions that draw specifically on that topic. This allows them to see the relevance and value of the review, and to have more success with the questions by being active participants in the review.

I know the end of the year can be chaotic, but end of the year testing is still important to both you and the students and we all want them to do their best. This can even ben a time to try some changes to routines in preparation for next year, and to keep things fresh at the end of this year.

I find this review structure (with some use of games or stations periodically to break it up depending upon your group and your time schedule) to be successful because students know what to expect, and they can see the purpose behind it. It is important that students buy-in to the review strategy, and understand what that the plan is, and the reasoning behind what you are asking them to do. Sometimes I even kick-off review with a contract that I have the students create and sign regarding which actions they plan to take to ensure that they do well (study each night, stay after school for extra help, participate in review, etc). This makes it clear where they are going. They can feel success as they complete it, and they also have a study resource when they are finished. Instead of being bored, students actually look forward to the structure, knowing what’s coming next, and seeing some progress in their learning and their scores.

I hope you will head over here, check out the previews, and try it out for yourself if you teach Biology. Please let me know what you think!!

Tips to a successful year end review in Regents Living Environment or other Biology Courses

Mar 25, 2017

Excellent Collection of Science Teacher Free Resources


A collection of free science resources for you

I Know You Need Free Resources

When I look out the window all I see is SNOW! Day after day.  We have had a couple of snow days recently, and no break in sight.  This is the time when the school year really drags. Your plans get thrown off.  Sick kids (or sickness yourself), long dark days, and it all starts to seem like too much.  There are days you just want someone else to come up with a plan for you, or give you something that you can use when your plans won't work.

Myself and several other TpT sellers have collaborated to collect a variety of free Science TpT resources to help you and you students!   There is a great combination of hands-on activities, literacy activities, and even homework and review!

Feb 24, 2017

6 Interesting and Simple Tips For Using Photos in Class

Why would you want to use photos in class? And How?

You want to do an activity with your students, but you just don't have the materials to do a great hands-on lab that you imagined.  Then you realize that you could do it as a demo, but it will be hard for all the students to see what you are trying to show.  And what about students who are absent?

Or maybe you wish you could show your students something under the microscope but don't have a projecting microscope.  Perhaps you want to show them other areas of the world, but can't take them there.  Sometimes a picture really is worth a 1000 words. A picture is something students will remember and have stuck in their heads.

Where to find photos

As teachers, we should ideally model proper behavior with regard to copyrights and use of photos.  There are several sites such as pixabay.com, creative commons search, and other that can be used in class. I was not aware of photosforclass.com and I found this photo that would be great teaching the parts of a flower, or even provoking discussion prior to doing a lab. I loved that when I downloaded this photo, it already came with the credit and citation on it. As far as science, most government sites (think about NASA, USDA, USEPA, etc) are Public Domain because they are government works. You can check those out here


Some photo sites (both social sites and photo sites) are blocked at school, so this made it more difficult. You will have to check if they are blocked at your school. Otherwise you may need to take steps to either unlock them, or gather your pictures at home.

What do with them once you've got them

I could see using photos to help explain a concept, provoke interest, or even for a student who had missed class. They are also great discussion starters to practice skills such as inferencing and to bring concepts back to real life, so that they don't only exist in textbooks or diagrams. We get so used to seeing diagrams, that it can be useful to see real photographs.

I was not familiar with BigHugeLabs and I think this could be a lot of fun. Their slogan is "Helping you do cool stuff with your digital photos since 2005. :-)" There are lot of way you could do fun projects with students on here!

It could be useful to make fun, attention-getting posters or bulletin boards, but students could also use this for an assignment. They could use this to make, for example, trading cards for a particular kingdom, or even types of rocks (igneous, sedimentary, metamorphic) using photos they found. Students could also make trading cards or movie posters for famous scientists, for example.  This would be a great way to get students working with digital photos as a project.

Using Photos to Reach Outside of the Classroom

The ideas to use instagram in your classroom on a blog could also be used in a classroom blog, website, or newsletter and would be great ideas and great uses for classroom pictures. My son's class uses Bloomz to communicate with parents, and the teacher sometimes takes photos and shares them through Bloomz. It is fun to see what is going on at school, and to have the prompts to talk to him about the class activities.  Although this post is labelled for instagram, it certainly wouldn't have to be.

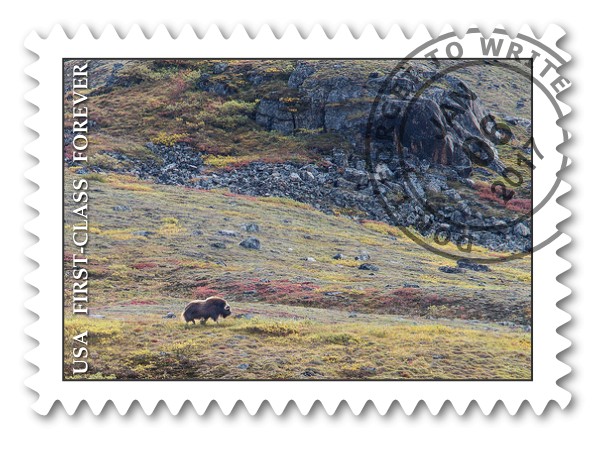
framea4c0f91fce424b501c1691984351da6d763fd2fe.jpgAnother fun site is http://photofunia.com/ but I'm not sure the application yet.  I used pixlr.com (I think) to create this "Polaroid" and "Postage Stamp" of a faraway place.  Students could then write about the geology/weather/climate/wildlife in that place.

I could see looking at changes in the land use and even the landforms if good historical photos were available, but I had trouble finding a good source.


frame6104acaf86fbe83181de789d840379417477e6c9.jpg

photo credit: Ted LaBar Musk Ox via photopin (license)

A few other related ideas

I have given my students in AP Environmental Science a mapping project where they have to build up a map and add environmental events and photographs. This is working well so far. Here is an example.  This could be expanded to include more photographs.

Years ago I did a project on weathering and erosion using this website, which has photographs and data on a real rock wall, built of all different types of rock, from all over the US (or the world?)

Lastly, I really liked the "Dear Photograph" project. The concept behind this project is to "Take a picture of a picture from the past in the present." See an example here. This seems to be done mostly in terms of nostalgia and relationships, which might lend itself better to history or English.  I am still  pondering where this could be applied.

I'd love to hear how you use photographs in your classroom, or what you do if you are trying to capture and experience for students without hands on materials.


Tips for places to look and projects and ways to use photographs in the classroom

Related Posts Plugin for WordPress, Blogger...